> For the complete documentation index, see [llms.txt](https://kb.logicerp.com/llms.txt). Markdown versions of documentation pages are available by appending `.md` to page URLs; this page is available as [Markdown](https://kb.logicerp.com/logic-erp-version-release-notes/november-2019/general/how-to-setup-logicmobile-pos-on-windows-10.md).
# How to Setup LogicMobile POS on Windows 10?
### System Requirements
**->**Dot Net Framework 4.5 should be installed on the machine for running Mobile POS.\
**->**IIS (Internet Information Services) should be installed on the machine.\
**->**SQL Server as a backend database.
**For IIS installation help, please refer the following link:**
[**HOW TO INSTALL IIS ON WINDOWS 10?**](https://www.logicerp.com/blog/knowledgebase/how-to-install-iis-on-windows-10/)
### Installing Logic Mobile POS on Windows 10
**Step-1** Download LogicMobilePOS setup from the following link:
[**Download Logic Mobile POS in .zip format**](http://www.logicerp.com/downloads/webpos/logicmobilepossetup.zip)
[**Download Logic Mobile POS in .exe format**](http://www.logicerp.com/downloads/webpos/logicmobilepossetup.exe)
**Step-2** Right-click on the step up and click on “Run as Administrator” to begin the installation process.
**Step-3** Select the installation path and click on “Install” Button.\
*(e.g. You want to install a website in ‘D:\websites\mobilepos’ folder, then enter the path or click on browse button)*
#### Note: Do not give space when entering installation path. Also, do not Close the application until next window opens automatically.
**Step-4** After the installation complete, Logic Website Activate/Update Manager will appear. Click on ‘Yes’ button to start the installation process automatically.
**Wait for the installation process to complete:**
**Step-5** A message box will appear asking for your confirmation to ‘Setup New Website’.
\*\*Read this step carefully:
-To Setup, a new website on IIS, **Click on NO**\
-For linking the existing website, **Click on YES**
**Step-6** If you want to set up a new website, then enter the ‘Website Properties’ as shown in the figure below:
Fill the following details:\
**1.** Enter site name and pool name.\
**2.** Select the Physical Path to install the website.\
**3.** Enter hostname.
Note: Hostname is the domain name which you will use to access your website. If you have purchased a domain for POS Application from some domain provider the enter the name of that domain. If you don’t have a domain and want to access the website over the LAN(Local Area Network) only then enter any domain name (like pos.yourcompanyname.com or mobilepos.yourcompanyname.in). If you use your company name, do not include spaces or any special character. Try to keep hostname unique so that no other person should enter the same name.
**4.** Define the Protocol, IP address, and port number.
Note: Tick the ‘Enable 64 Bit Application’ button if 64-Bit Windows 10 installed in your computer.
**Step-7** Now, click on Login Button and enter your LOGIC login ID and Password.
**Client Details will appear on the screen:**
**Step-8** Click on ‘Activate Product’ button to enter your product key details.
**Step-9** Now, Click on the ‘Edit Configuration’ button.
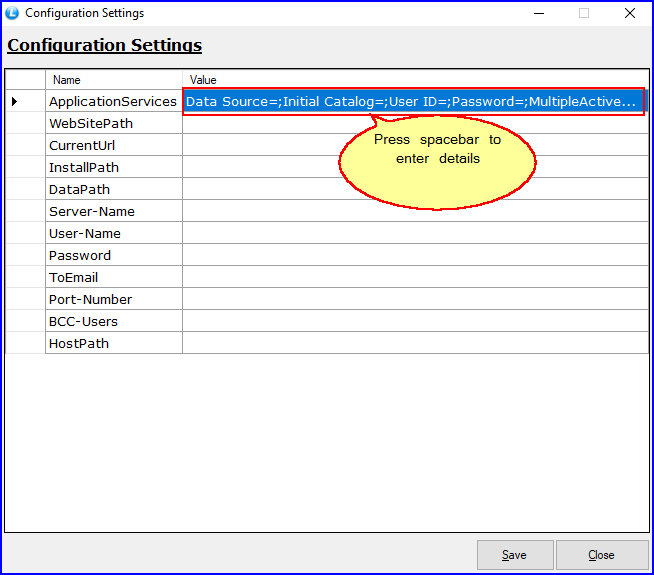
**Step-10** In the ‘Configuration Setting’ window, enter the following details:\
**1.** Application Services\
**2.** **Website Path**: Define the physical path of the website.\
**3.** **Current URL**: It will be the Host Name you selected for your website.\
**4.** Install Path\
**5.** Data Path
**Step-11** Click on ‘Save’ button.
Go to ‘ApplicationServices’ and press spacebar on your keyboard. The following window will open:
**Step-12** Allow Access to the website over a network. For accessing the website over the network, you need to add an entry in hosts file. There are two methods for adding the entry in the host’s file in Windows Computer:
**1.** Manual Entry, or\
**2.** Generate Host Editor for automatic entry\
You have to use only one method that you find suitable.
#### Manual Entry:
To Manually add an entry in the host file. Follow the steps given below:\
->Right-click on Notepad & click on **Run as Administrator.**
->In the notepad, go to ‘File’ option & click on the ‘Open’ button. Now, Enter the path of the File: **C:\Windows\System32\Drivers\etc**
->Change the filter from \*.txt to All Files.
->Select hosts file.
->Add the following line in the host file:\
*IPAddress domain name*\
**For example:**\
*192.168.1.13 logicpos.abc.com*
->Now, save the file and open the website in a browser.
#### Generate Hosts Editor for Auto Entry:
->Double-click on ‘Website (\_\_) is Running and Online’ option as shown in the figure below:
->Enter the Host Name and IP Address and click on **Generate** button.
->A dialogue box will appear asking for your confirmation. Click ‘**Yes'.**
->Now, go to the path where your Hosts Editor file is generated. It will be saved by the name of ‘hosteditor.exe’. With this file, you can run your website in any system. All you need to do is provide your ‘hosteditor.exe’ file to the user. They can run this file to access the website.
Note: There will be another file with the name ‘hostedit.exe’ in the same folder. Do not use that file. Only use ‘hosteditor.exe’ file.
Make sure you enable user login in LOGIC Mobile POS. To know how you can do that, please follow the following link:
[**HOW TO ENABLE USER LOGIN IN LOGIC MOBILE POS?**](https://www.logicerp.com/tutorials/2019/02/07/how-to-enable-user-login-in-logic-mobile-pos/)
When you try to open your website in the browser, there are chances that it might not open due to the wrong date and time format. To change the date-time format in IIS, click the link below:
[**HOW TO CHANGE DATE-TIME FORMAT IN IIS ON WINDOWS 10?**](https://www.logicerp.com/blog/knowledgebase/change-date-time-format-in-iis-on-windows10/)
If you want any help regarding this matter, you can contact our support team at [**http://www.logicerp.com/Company/Contact**](http://www.logicerp.com/Company/Contact)
---
# Agent Instructions
This documentation is published with GitBook. GitBook is the documentation platform designed so that both humans and AI agents can read, navigate, and reason over technical content effectively. Learn more at gitbook.com.
## Querying This Documentation
If you need additional information that is not directly available in this page, you can query the documentation dynamically by asking a question.
Perform an HTTP GET request on the current page URL with the `ask` query parameter, and the optional `goal` query parameter:
```
GET https://kb.logicerp.com/logic-erp-version-release-notes/november-2019/general/how-to-setup-logicmobile-pos-on-windows-10.md?ask=&goal=
```
`ask` is the immediate question: it should be specific, self-contained, and written in natural language.
`goal` is optional and describes the broader end goal you are ultimately trying to accomplish on behalf of the user. GitBook uses it to tailor the answer towards what is most useful for that goal.
The response will contain a direct answer to the question and relevant excerpts and sources from the documentation.
Use this mechanism when the answer is not explicitly present in the current page, you need clarification or additional context, or you want to retrieve related documentation sections.